The grater

Difficulty: 4

Elegant sewn necklace made with PRECIOSA Tee™

Would you like to stand out with an original exclusive necklace? Try making it according to this tutorial.

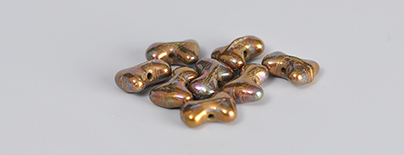
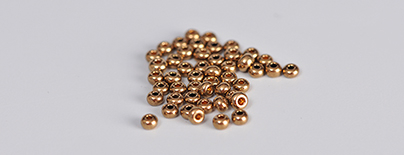
Use the quirky PRECIOSA Tee™ bead together with PRECIOSA Rocailles. You can choose from  wide range of colors and finishes.

Helena Chmelíková

She is able to switch from luxurious and extravagant fashion show pieces to the preparation of hobby projects,
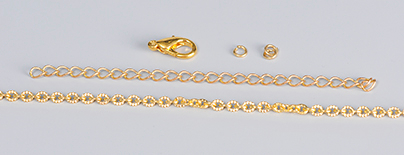
Learn More

Material and Tools

Materials

A carabiner; a 5 mm ring; a decorative chain; an adjusting chain

Tools

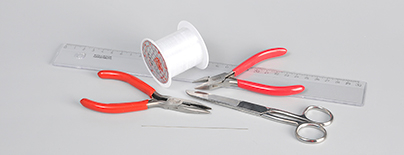
A 0.20 mm nylon line; a very thin needle; scissors; flat nose pliers; snipping pliers; a ruler

Procedure

The arc of the necklace is created from rows of R10 and T. They are linked together. 4x R10 are sewn between the T, while 3 are sufficient, if the R10 are at the edge. Sew the basic rectangle from 7 rows. The neighbouring rectangles have part of the outer row in common. A wedge of R10 and T is sewn between them. There are nine rectangles with eight wedges between them. Rows with 3x T are sewn on the edges. The chains are connected to them.

Step 1

The 1st - 2nd rows. String 2x R10, 1x T. Thread the line through both R10 again. String 1x R10, 1x T and 2x R10. Thread the line through the T one more time. Continue this alternating stringing of R10 and T 3 more times.

The sewing principle - the rear

1

Step 2

The 2nd - 3rd row. Thread the line through the T. String 2x R10. Thread the line through the same T again. String 1x R10. Thread the line through 2x R10 from Step 1. String 1x T. Thread the line through 2x R10 again. String 1x R10. Continue adding the R10 and T and threading the line through them.

The sewing principle - the rear

2

Step 3

Continue as in Step 1 and 2 until you have a rectangle consisting of 7 rows (fig. 4).

Step 4

In the 7th row, no longer add the R10 and T to the 8th row. Only add one each of the R10.

4

Step 5

The wedge. When sewing on a new rectangle, use the outer row of the previous rectangle as the 7th row. Sew 2x R10 from the previous rectangle to the T. Add 1x R10 between each of them. String 2x R10 above the central T. Add 1x T above the neighbouring 2x R10, connect it with the T from the neighbouring rectangle. Sew 2x R10 and 1x T above the outer T and join them with the neighbouring ones.

The wedge - the rear

5 / a

Step 6

Cut the chain into two pieces of each length. The difference between them should be about 1 cm. The total length of the necklace is 39 cm and the chains are 11.2 cm and 12.3 cm.

6

Step 7

The last rows at the edge of the arc. Once again sew on the T and R10. Create a loop of 4x R10 above the outer T. String 2x R10, a link of the chain and 2x R10 and thread the line through them 3 times. Thread the end of the line through the previous row and sew it in.

The rear

7 / a

Step 8

Snip off about 16 cm of adjusting chain. Connect the end links of the decorative and adjusting chains using one ring. Connect a carabiner to the second end of the chains.

8 / a

Downloads

Gallery

/ a