Charming Hearts Collection

Difficulty: 1
Techniques: Brick stitch

Seed beads Hearts

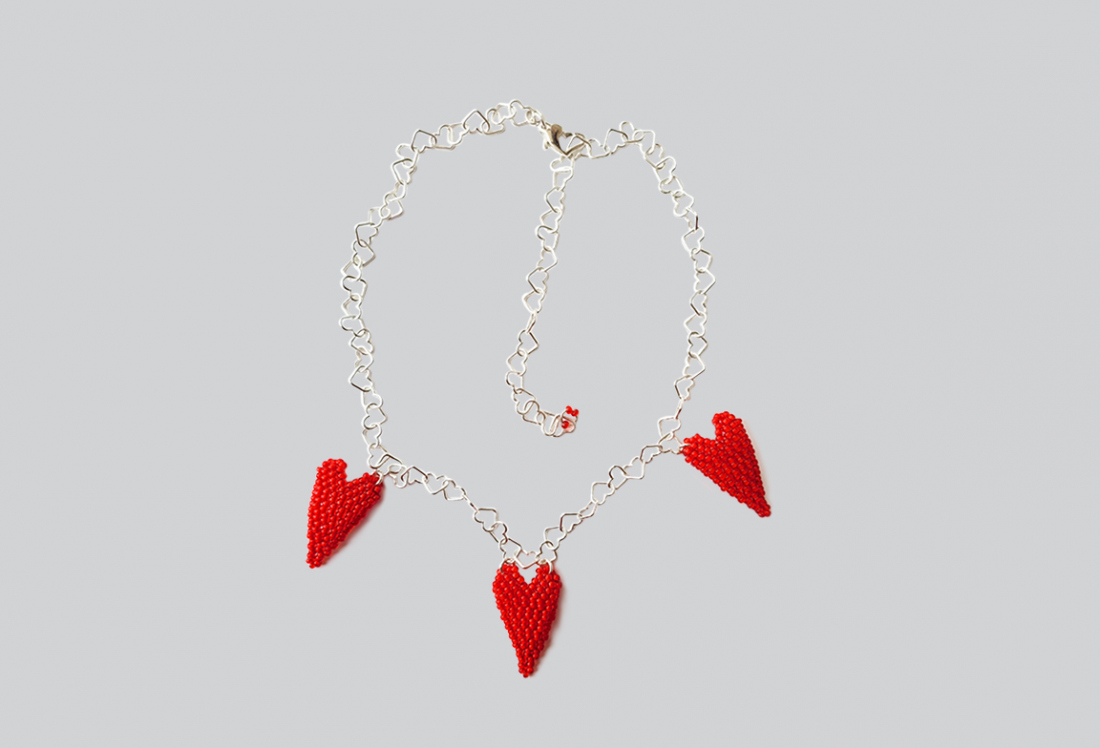
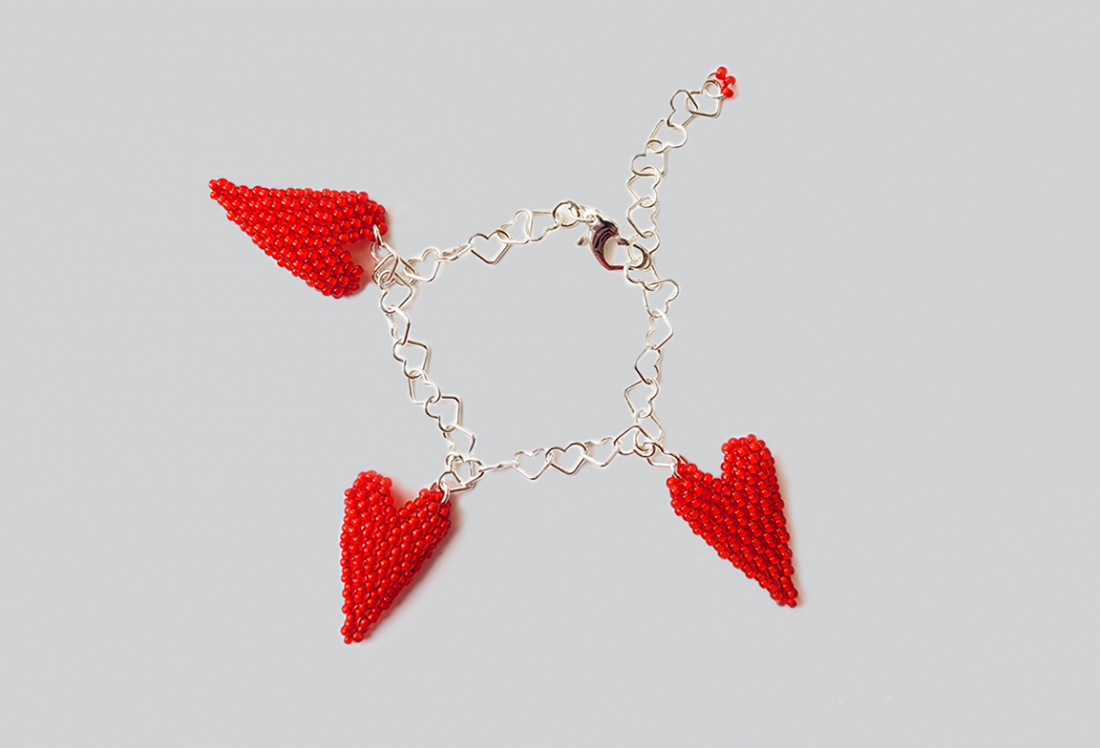
Celebrate St. Valentine’s Day in style by adorning yourself with this romantic set of jewelry. Use simple brick stitch and vivid red PRECIOSA White Lining rocailles to create heart-shaped motifs and then suspend them from chain to build a sentimental collection.

Ambassadors

Kerrie Slade

Kerrie Slade have used Czech PRECIOSA Traditional Czech seed beads in her creation.

Learn More

Materials & Tools

Other materials and tools

Beading thread; K.O. red; Readymade chain with open links; approximately 80 cm; Clasps; 2x; Earring findings; 1 pair; Jump rings; 5mm 15x; Flat nose pliers; 2x; Wire cutters Scissors; Size 10 to 15 beading needles

Procedure

Step 1

Thread your needle with 90 cm of thread and pick up 4x R10. Leaving a 15 cm tail, pass your needle through the first 2 R10 again so that you have 2 stacks of 2x R10 sitting side by side. Figure no. 1.

1

Step 2

Pass your needle through the second pair of R10 added in the previous step, pick up 3x R10 and pass through the first pair of R10 added in the previous step. Figure 2.

2

Step 3

Working in 2-drop brick stitch, pick up 4x R10 and pass your needle under the pair of threads (thread bridge) on top of the 2 pairs of R10 added in step 1 and back through the second 2x R10 added in this row. Complete the row by picking up 2x R10, passing your needle under the same thread bridge and back through the new pair of R10s. Figure 3.

3

Step 4

Using the same method, work the next row. Pick up 4x R10 and pass your needle under the last thread bridge created in the previous row and back through the second 2x R10 added in this row. Pick up 2x R10 and pass your needle under the first thread bridge created in the previous row and back through the new pair of R10s. Pick up 2x R10 and pass your needle under the first thread bridge again and back through the new pair of R10s. Figure 4.

4

Step 5

Following figure 5 work the next 4 rows. Remember that the 4x R10 at the beginning of each row are picked up at the same time and the remaining pairs are added 2 at a time. Add 2 stacks to the first and last thread bridges in each row and 1 stack to the other thread bridges.

5

Step 6

Following figure no. 6a work a row of single-drop brick stitch, adding single rocailles instead of pairs. Figure no. 6b.

6 / a

Step 7

Continue working in single-drop brick stitch and follow figure no. 7 to begin creating the right-hand curve of the heart.

7

Step 8

Follow figure 8 to work the next 2 rows of the curve. These are what is known as decrease rows, so miss the final thread bridge created in the previous row and instead anchor the first 2x R10 to the second to last thread bridge.

8

Step 9

Pick up 4x R10 and pass your needle down the first R10 added in the previous row. Figure no 9a and 9b.

9 / a

Step 10

Pass your needle through all the rocailles on the outside edge of the heart to exit the first R10 added in step 6. Work the left-hand curve of the heart as shown in Figure no. 10a and 10b.

10 / a

Step 11

Using the working thread, pass through all the rocailles around the outside edge of the heart (together with the centre rocaille added in step 6 and the 2 centre stacks in the final row of step 5) as shown in Figure 11 pulling your thread firmly as you work. Tie off and trim both threads.

11

Step 12

For the full set, follow steps 1 – 11 to make a total of 8 hearts.

Step 13

To make the bracelet:

Using the wire cutters, cut a section of chain approximately 20 cm in length which includes an extension chain (check for fit before cutting). Open a jump ring with the pliers and pass it through a link at one end of the chain and through the clasp before closing it again. Open another jump ring, thread 3x R10 onto it and then pass it through the link at the other end of the chain before closing it. Using the photo for guidance, decide on the placement of your hearts and attach 3 to the chain by passing a jump ring under the last 4 rocailles added in either step 9 or step 10 and through a link on the chain before closing it again. You may wish to vary whether each heart hangs from either the right or the left-hand curve to add interest to the finished piece. Figure 13.

13

Step 14

To make the necklace

Repeat step 13 using a section of chain approximately 48 cm in length (which allows for an extension chain). Attach the central heart by passing a jump ring through both the left and right-hand curves and passing them through 2 separate chain links. Figure 14.

14

Step 15

To make the earrings

Cut 2 pieces of chain approximately 4 cm in length each. Using a jump ring, attach a heart to 1 end of each section and attach the other ends to an earring finding with another jump ring. You might like to suspend 1 heart from the right-hand curve and 1 from the left so that they frame the face when worn. Figure 15.

15

Downloads