Rose Window Rivolis

Difficulty: 3
Techniques: Weaving around

Rivoli Earrings with Cut Seed Beads

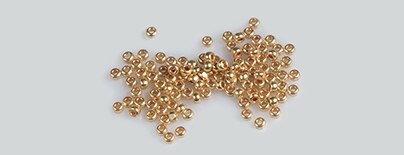
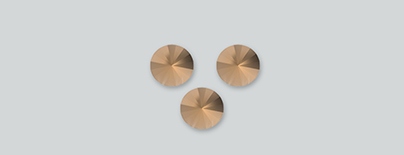
Capture the brilliance of the Rivoli stone in a web of glittering Charlottes and create charming earrings reminiscent of the round stained glass windows, typical in Gothic architecture. We present a DIY Guide for earrings made of sparkling Rivoli beads embroidered with dainty PRECIOSA Traditional Czech Beads™. The Rivoli facets glitter in the beaded lattice made from cut seed beads: PRECIOSA Charlottes. Together they capture the majestic brilliance of Gothic stained glass windows and thanks to the colorful range of Charlotte beads and Rivoli stones you can create your own unique design to match any outfit or accessory. The gold version shown here, however, will perfectly accent even the most beautiful evening gown. If you aspire to create a complete set, you can join two embroidered Rivoli stones to form a pendant for a gold cord or chain.


Ambassadors

Kerrie Slade

Kerrie Slade have used Czech PRECIOSA Traditional Czech seed beads in her creation.
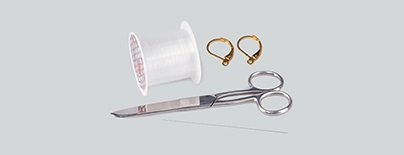
Learn More

Material and Tools

Tools

Thread or thin jewelry string for beading (0.12 mm); beading needle (size 10 to 12), scissors, earring hooks (gold)

Procedure

The finished earrings are about 7 cm long.


Step 1

Thread your needle with 90 cm of thread and leaving a 15 cm tail pick up 16x CH and pass your needle through the first bead again to form a circle. Pass your needle through all of the beads a second time (fig. no. 1).

1

Step 2

For the next row, add 3x CH between every second bead added in the previous step to form 8 'nets'. Complete the row by stepping up through the first 2 CH only of this row (fig. no. 2).

2

Step 3

Working in netting stitch, add 5x CH between the middle (2nd) CH of each net created in the previous row. Complete the row by stepping up through the first 2 CH only of this row (fig. no. 3).

3

Step 4

Add 7x CH between each middle (3rd) CH added in the previous row. Complete the row by stepping up through the first 4 CH only of this row (fig. no. 4).

4

Step 5

Place a Rivoli face down on your work and carefully holding the Rivoli in place add 5x CH between each middle (4th) CH added in the previous row. Complete the row by stepping up through the first 3 CH only of this row and pull your thread firmly so that little or no thread is showing and your Rivoli is held in place (don't worry if your Rivoli is still slightly loose, the next row will secure it firmly).

5

Step 6

From now on you will be working on the back of your earring component. Add 5x CH between each middle (3rd) CH added in the previous row. Complete the row by stepping up through the first 3 CH only of this row (fig. no. 6).

6

Step 7

Add 3x CH between each middle (3rd) CH added in the previous row. Complete
the row by stepping up through the first 2 CH only of this row. (fig. no. 7).

7

Step 8

Add 3x CH between each middle (2nd) bead added in the previous row. Complete the row by stepping up through the first 2 CH only of this row (fig. no. 8).

8

Step 9

Add 1x CH between each middle (2nd) CH added in the previous row. Complete the row by stepping up through the first CH only of this row (fig. no. 9).

9

Step 10

Pass your needle through all the CH in the previous row again. Pull both the working thread and tail threads firmly so that little or no thread shows and tie off and trim the tail thread only and set your work aside.

Step 11

To make a pair of earrings:


Follow steps 1 to 10 to make 2 more components.

Step 12

Using a working thread, travel through your work until your needle exits a middle CH of a 7 CH net (added in step 4). Pick up 3x CH and pass your needle through the corresponding CH on another component. Pick up 3x CH and pass your needle through the CH your needle was exiting at the beginning of this step (fig. no. 12).

12

Step 13

Pass your needle through the first and third CH added in the previous step and the middle CH of the 7 CH net and pull your thread tightly so that the middle CH of the 3 CH group pops up into a point. Repeat this with the second set of 3 CH added in the previous step and pass your needle through all 6 CH again. Tie off and trim this thread only (fig. no. 13).

13

Step 14

Repeat the previous step to attach the third component making sure that the 3 components hang in a straight line.

Step 15

To create the hanging loop, use the remaining thread and travel through your work until your needle exits a middle CH of a 7 bead net (added in step 4) at either the top or bottom of your row of 3 components. Pick up 6x CH and pass your needle through the middle CH of the net again (fig. no. 15).

15

Step 16

To complete the loop, pass your needle through the first and third CH added in the previous step and pick up 1x CH. Pull your thread tightly so that the middle CH of the 3 bead group pops up into a point. Pass your needle through the fourth and sixth CH added in the previous step and the middle CH of the 7 CH net and pull your thread tightly to create the second point. See Figure 13 and Figure 14. Pass your needle through all the CH in the loop again to strengthen it and tie off and trim the remaining thread (fig. no. 16a, 16b).

16 / a

Step 17

Pass an earring finding through the hanging loop.

Step 18

Repeat all of the above steps to create a second earring.

Downloads

Gallery

/ a