For the queen of the ball

Difficulty: 5
Technique: Beadweaving - Right Angle Weave, linking

For the queen of the ball

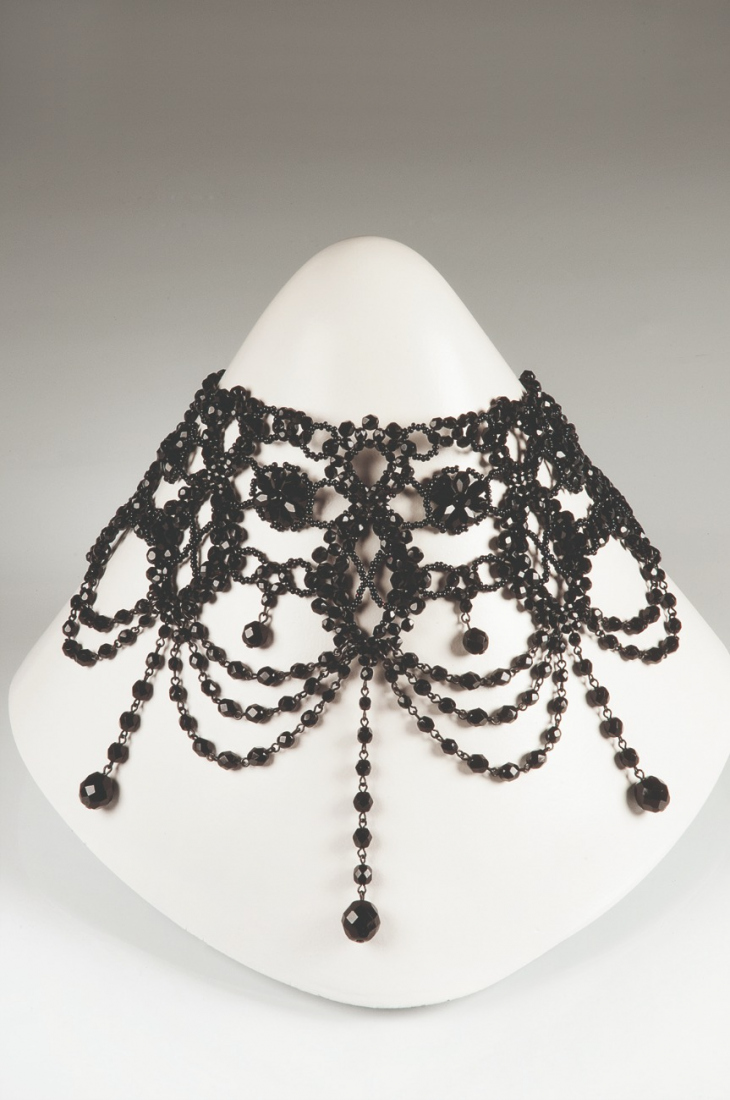
One of the phenomena which Jizera Mountains costume jewellery now boasts is jet or black costume jewellery.
The history of jewellery made of jet, which is a rare type of brown coal, stretches back several thousands of years into the past. It was used to adorn the people of the Stone Age, the Babylonians and the Romans and they ascribed curative properties to it. Given the fact that real jet was too expensive, excellent cheap imitations were made using different materials. Thanks to its general popularity, it began to be imitated in England and France using glass. It was just a matter of time before the production of imitation jet jewellery came to the Jizera Mountains in association with the Europe-wide “black fashion”. 
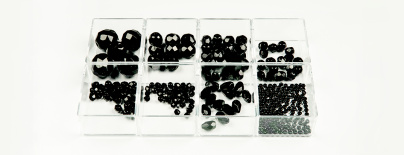
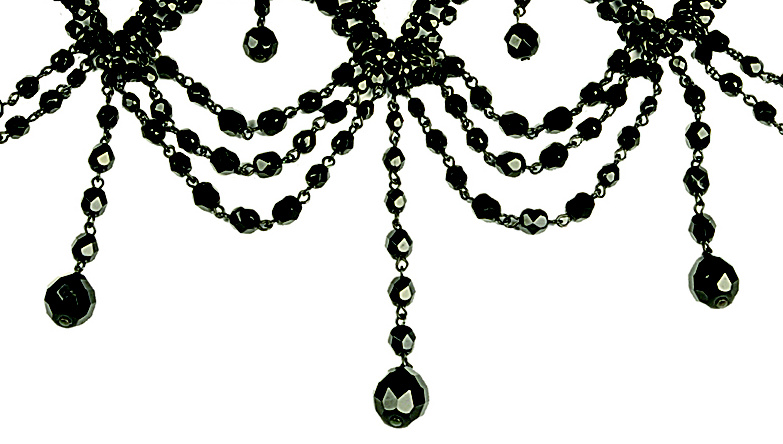
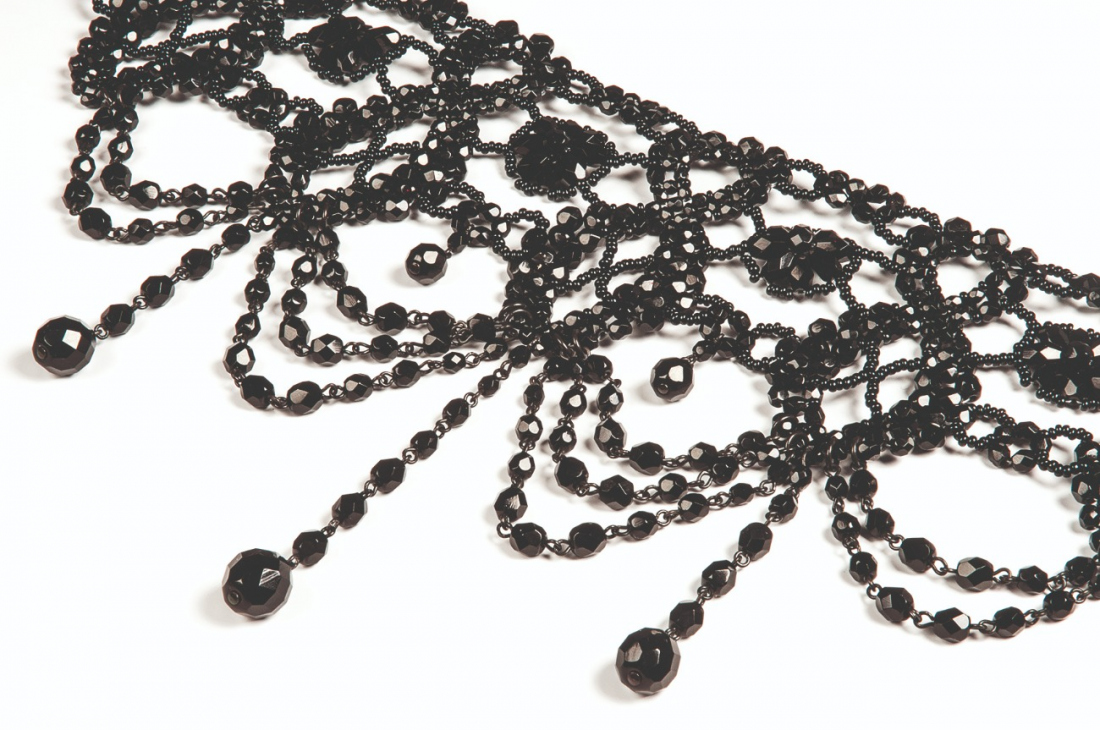
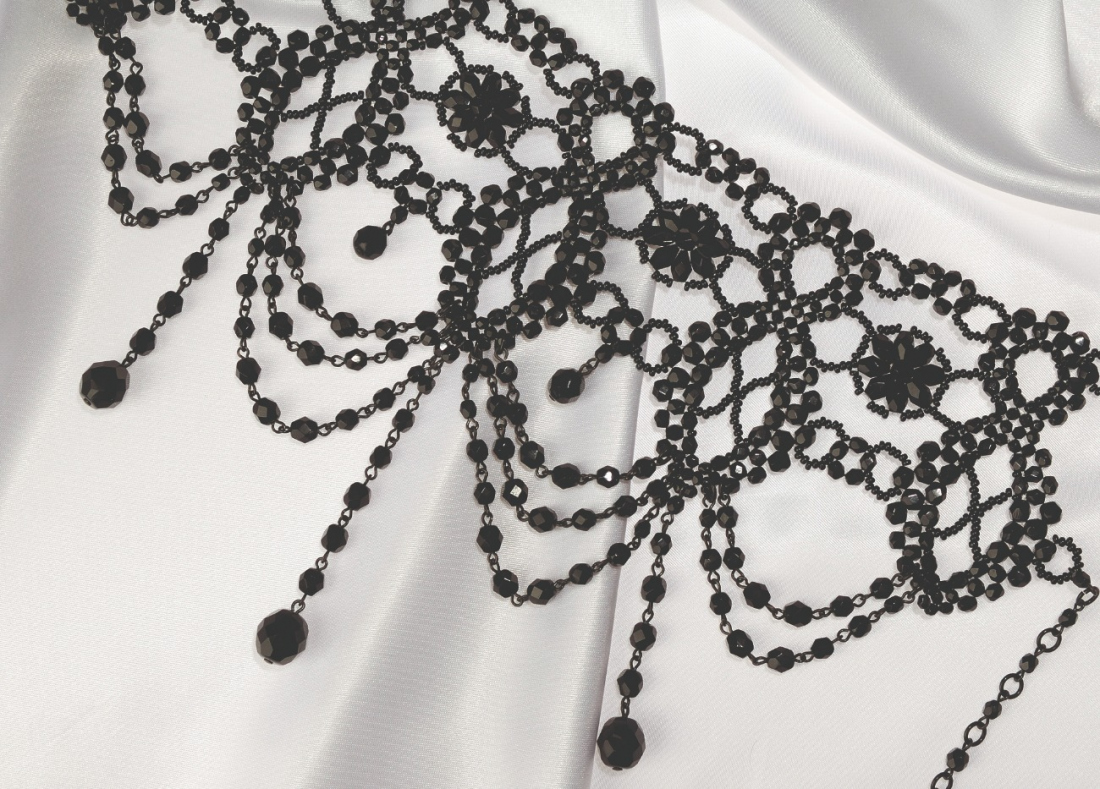
We will bring you a touch of history and present a tutorial for the production of a luxurious set of black costume jewellery made of seed beads and beads from the PRECIOSA Traditional Czech BeadsTM range.

Ambassadors

Helena Chmelíková

She is able to switch from luxurious and extravagant fashion show pieces to the preparation of hobby projects,
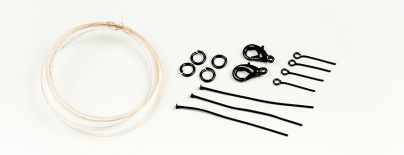
Learn More

Procedure

This pattern is for highly skilled and patient “bead workers”. This involves an unusual puzzle. First sew 5x so-called doll shapes and 4x flowers. Then connect everything, one row after another and then link the lower section at the end.

Step 1

The doll shape

First sew the lower section, the almond shape, and then the top section, the teardrop shape.

The almond shape
Secure the nylon at the end with a rocaille and string FPB 2x 3 mm, 4x 4 mm, 5x 5 mm, 4x 4 mm, 8x 3 mm, 4x 4 mm, 5x 5 mm, 4x 4 mm and 6x 3 mm. Leave some free nylon at the beginning (15 cm) (figure no. 1a).

Threading (figure no. 1b)

Connecting both ends (figure no. 1c)
Then tighten the beads on the inner edge, string 1x R in every second and third gap from the point, thread a 3 mm FPB and secure with a single knot.

1 / a

Step 2

The teardrop
String 3x 3 mm FPB, pass the line through the 3 mm FPB in common with the almond shape and string a further 2x 3 mm FPB, then string 1x 4 mm FPB, 2x 3 mm FPB and pass the line through the 3 mm FPB from the created square and then pass the line through the 1x 4 mm FPB and 1x 3 mm FPB once more. Continue by stringing the FPB:
1x 3 mm and 2x 4 mm and pass the line through 1x 3 mm, 1x 3 mm and 1x 4 mm,
1x 5 mm, 1x 4 mm and 1x 3 mm and pass the line through 1x 4 mm, 1x 5 mm and 1x 4 mm,
1x 3 mm, 1x 4 mm and 1x 5 mm and pass the line through 1x 4 mm, 1x 3 mm and 1x 4 mm,
1x 5 mm, 1x 4 mm and 1x 3 mm and pass the line through 1x 4 mm, 1x 5 mm and 1x 4 mm,
1x 3 mm, 1x 4 mm and 1x 5 mm and pass the line through 1x 4 mm, 1x 3 mm and 1x 4 mm,
1x 5 mm, 1x 4 mm and 1x 3 mm and pass the line through 1x 4 mm, 1x 5 mm and 1x 4 mm,
2x 3 mm and 1x 4 mm and pass the line through 1x 4 mm and 2x 3 mm,
1x 4 mm and 2x 3 mm and pass the line through 1x 3 mm, 1x 4 mm and 1x 3 mm (figure nos. 2 and 3).


2

Step 3

Connect the almond shape and the teardrop (figure no. 3a)

Then tighten the beads of the internal edge – start with the 3 mm FPB, add 1x R, secure with a knot and cut off the remainder of the nylon (figure no. 3b).

3

Step 4

The flower

String 1x FPP, 4x R, 2x FPP, 4x R, 2x FPP, 4x R, 2x FPP, 4x R and 1x FPP (in the case of the pears, this depends on the position – see the illustration 4a, 4b).

Threading (figure no. 4b)
Connection – string 4x R, thread the line through the second outer pear, tie the nylon and cut it off (figure no. 4c).

4 / a

Step 5

Linking

The arches
The shortest – 4x (FPB 2x 5 mm, 2x 6 mm, 2x 5 mm), the centre 4x (FPB 1x 4 mm, 2x 5 mm, 2x 6 mm, 2x 5 mm, 1x 4 mm), the longest 2x (FPB 2x 4 mm, 2x 5 mm, 3x 6 mm, 2x 5 mm, 2x 4 mm).

Pendants
The side 2x (FPB 12 mm, 3x 6 mm, 1x 5 mm, 1x 4 mm), the centre (FPB 12 mm, 3x 6 mm, 2x 5 mm, 2x 4 mm), the shortest 2x (FPB 8 mm, 4 mm), dangles (FPB 2x 8 mm, 1x 5 mm, 3x 4 mm and add rings between them).

5 / a

Step 6

At the end, attach everything to the necklace – the pendants, the central arch and the longest arch are connected to the second square from the top of the doll shape and the shortest arch is connected to the third square. Open the ring, do not slide it into the gap, add an eye pin and close it on the eye pin at the snap hook, string a 4 mm seed bead at the dangle and the lower row and create a loop, affix the snap hook using rings, slightly open the last ring at the dangle, add it to the connecting loop and close.

Step 7

Rows

The top row (no. 1 in figure no. 7)
Start with the doll shape – string a 4 mm FPB to the internal circumference and pass the line through part of the upper arch, then thread the line through 1x 4 mm FPB and 1x  mm FPB, add 7x R, 6x 4 mm FPB and 9x R and thread the line through the 5 mm FPB from the doll shape (from above), then continue in the same way to the end. Make a loop behind the last, i.e. the fifth, doll shape – string 8x R, an eye pin, 10x R and pass the line through the 5 mm FPB. Then head back; thread the line back through the arch and the 5 mm FPB (in the downwards direction), string 7x R and continue to the first 4 mm FPB so that a circle is made, string 2x 4 mm FPB and continue to the third 4 mm FPB, then add 1x 4 mm FPB, pass the line through the last FPB and additionally string 9x R, thread the line through the 5 mm FPB and continue to the last doll shape. Once again create a loop at the end, but begin with 10x R, tie off the nylon and cut it.

7

Step 8

The central row (no. 2 in figure no. 8)
Start in the middle of the doll – pass the line upwards through the 3 mm and 4 mm FPB and string 1x R between them, then add 8x R, thread the line through the FPP, add the 5 mm FPB, leave out the top two FPP and pass the line through the third, add 8x R, thread the line through the 4 mm and 3 mm FPB and once again string 1x R between them. Then string the central 3 mm FPB and continue in the same way up to the last doll shape. At the last doll shape, thread the line through its central edge and return in the same way, but tie off the end of the nylon and cut it off in the lowest section.

8

Step 9

The lower row (no. 3 in figure no. 9)
Start in the middle of the almond shape – pass the line through 2x 5 mm FPB and 1x R to the centre, add 15x R and pass the line diagonally upwards through the R above the 5 mm FPB and also pass the line through this FPB, then pass the line through 2x 5 mm FPB on the outer edge of the doll, add 8x R, 3x 4 mm FPB and 8x R and pass the line through 3x 5 mm FPB and 1x R and add 15x R, then pass the line diagonally downwards through the R, pass the line through 3x 5 mm FPB, add 8x R, 4x 4 mm FPB and 8x R and then the 5 mm FPB again. Then continue in the same way as to the end loop (8x R, an eye pin, 8x R); see the picture no. 9. 

9

Step 10

When heading back, thread the line through 3x 5 mm FPB, but on the opposite side, only string 7x R in the centre of the almond shape, add the central R and another 7x R, pass the line through the R and 3x 5 mm FPB, add 8x R to the gap, pass the line through the outer 4 mm FPB, add 1x 4 mm FPB, thread the line through the end 4 mm FPB and add 8x R, also add 8x R to the second gap, but 2x 4 mm FPB in the middle with an eye pin. At the end create another loop, tie the nylon and cut.

10

Downloads